Tunneling to Jupyter
Jupyter is a terrific development environment, but I can't have some bloated hogbeast browser taking up a lot of RAM when I fine-tuning machine-learning code on an edge device like the NVidia Jetson Nano. The solution is actually pretty easy. Move the browser side of the Jupyter equation to a desktop. There are two approaches for this:
SSH (Secure Shell) Tunneling
Reverse Proxy
We'll take a quick peek at SSH tunneling, which fast and easy to set up. What we won't do is provide a full tutorial on the finer points of SSH. Any use of SSH comes with security risks, and you must take the necessary steps to ensure that both client and server are protected.
What To Do On The Nano
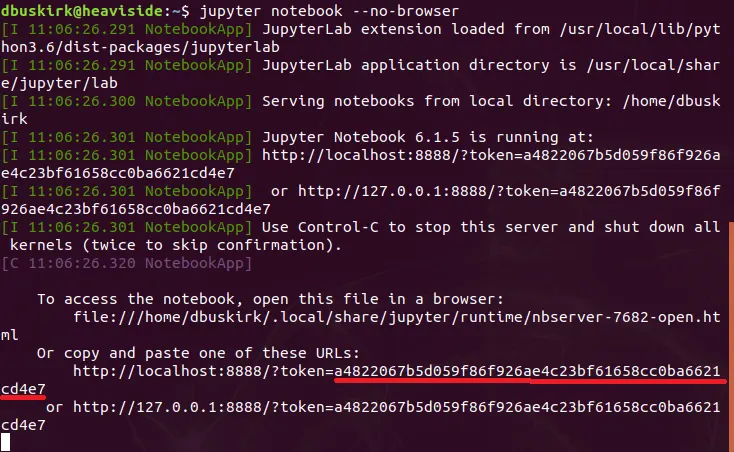
To start with, we can run the Jupyter server without automatically launching a browser anytime we want with a simply commandline parameter.
jupyter notebook --no-browser
It is important to note that the technique we're looking at here is just for you. It permits you to sit at a Jupyter notebook in a browser at your desktop and run code on a remote machine. This technique is not appropriate for creating a Jupyter network server to be accessed by multiple users. For that you will want to create a Jupyter hub, which we will not go into here.
Connecting to the Jupyter Server from a Remote Desktop
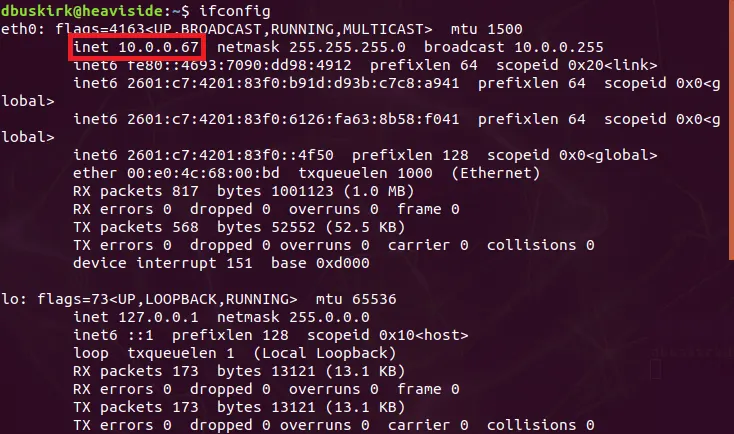
We'll need a couple of pieces of information. One, of course, is the IP address of the remote device, in this case a Jetson Nano. We will also copy the security token from Jupyter's startup information. Using the token is not necessary; setting up a Jupyter password is generally easier. We're starting with a token now just to illustrate a point. We'll need to record the token on the edge device, and use the token to connect from the desktop browser. Any means of copying the token to the desktop will do. We could, for instance, save it in a file and read the file remotely.
SSH Tunneling
SSH tunneling can be set up with the following command:ssh
-L 8000:localhost:8888 dbuskirk@10.0.0.67
In this example, dbuskirk@10.0.0.67is
the account name and IP address of the remote machine we would like
to connect to (the one where you started the Jupyter notebook
server). 8888 is the port number. 8888 is, of course, the default for
Jupyter, but Jupyter will use the next available port if 8888 is
already in use. You could,
if you like,
start Jupyter to use whatever port number you wish.In
this example, 8000 is the port number you would like to use on your
desktop. Once you have run the above command, you need only open a
browser on your desktop and enterlocalhost:8000
Creating a Jupyter Password
If you are experimenting, the token makes sense. If you are planning to access Jupyter remotely on a regular basis, creating a Jupyter password will be far easier. Once you create a Jupyter password, you must supply it everytime you use Jupyter, regardless of whether you are connecting locally or remotely.
You can create a password when you connect for the first time using SSH and a token. Jupyter itself will prompt you to do so.
Alternatively, you can create a Jupyter password at any time using the command
jupyter notebook password
Jupyter will save your newly created password in hashed for in the configuration file ./jupyter/jupyter_notebook_config.json. This file will be created if it does not already exist. If you would like to revert to the previous state of affairs, the password entry in this file can simply be removed.
Conclusions
In this example a tad over 500 MB of edge device memory was made available for Jetson inference by moving Jupyter's browser UI to a desktop machine.